FRETMEISTER
How to move up your Fretboard
Discovering the Fretboard
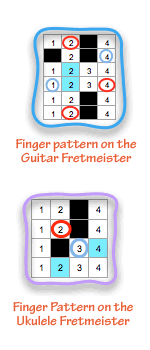
Finger PatternsThe fretboard can seem quite big but finger patterns break it down into manageable sections which make it much easier to learn.
Each string has all the notes you need to play your melody but it could be quite clumsy and difficult to just play the melody of a tune on one string having to move up and down the fretboard accurately at speed. Finger patterns show you how to play the same notes across the strings which is easier and will enable you to play more quickly. Some important insights into finger patterns. You can play a complete scale, major or minor, by starting at the root note and, from there, playing all the yellow notes, in sequence, within the finger patterns. Each of the five finger patterns gives you a full octave and a bit in one small area of the fretboard. The same finger patterns work for every major (and relative minor) key, you just start them at different places on the fretboard. They stay in the same overlapping sequence going up the fretboard whatever key you want to use. Root notes, blue notes and pentatonic scale notes are always in the same places in the finger patterns for every key. The suggested fingering (the numbered boxes on your fretmeister) are just a suggestion. They are a good way to learn and explore your fretboard but you might want to do it differently when you are playing something. There isn't a right or wrong way so find what works best for you for a particular melody, riff or lick. |
The numbers on the finger pattern charts suggest which finger to use when you're learning the patterns. 1 is the index finger 2 is the second finger 3 is the ring finger 4 is the little finger |
Your fretboard just got a whole lot smaller and now it's going to get smaller still.
If you play the lowest note on your fretboard and then the highest, there are an awful lot of notes in between, but actually, the majority of them are duplicates.
On your Fretmeister, choose one of the finger patterns with a square shape and line it up at the left side of the main window on the 0 fret (open strings). Now start from the bottom open string and play each yellow note going up the scale within the finger pattern. When you get to the top right yellow note, continue playing the yellow notes all along your top string as far as you can go. See what key you are in. You just played all the notes you can play in that key from the lowest to the highest.
If you move the slide of your Fretmeister along to the right you can use exactly the same pattern and sequence for another key, you just need to also play the yellow notes appearing to the left of that pattern on your bottom string.
That's all you need to know every note in every key. Oh yes, you also need to know where that pattern goes on the keyboard for each key.
So why do we need five finger patterns?
Well, some sequences of notes may just be easier to play in a different way. For example, for most of us our little finger is weaker than the rest so, for a fast sequence that would require too much strength or dexterity from your little finger, it might be easier to use the next overlapping pattern up the fretboard to play that sequence. Also, in some keys, your one finger pattern will be up near the top of the fretboard where the frets are closer together and the sound is different. Again, it may be easier to choose another pattern lower down the fretboard to play the same notes.
Well, some sequences of notes may just be easier to play in a different way. For example, for most of us our little finger is weaker than the rest so, for a fast sequence that would require too much strength or dexterity from your little finger, it might be easier to use the next overlapping pattern up the fretboard to play that sequence. Also, in some keys, your one finger pattern will be up near the top of the fretboard where the frets are closer together and the sound is different. Again, it may be easier to choose another pattern lower down the fretboard to play the same notes.
©Adam Rubinstein2017

